Donn Stewart
13917 Deviar Dr
Centreville, VA 20120
dstew@cpuville.com
13917 Deviar Dr
Centreville, VA 20120
dstew@cpuville.com
With the help of my new oscilloscope, and my friend and colleague Paulo (his YouTube channel), I have figured out that the glitch (see August 6, below) is due to noise on the data bus. The noise upsets the 32K RAM ICs from some manufacturers. The noise can be reduced by putting 100 or 56 ohm resistors in series with the data bus lines, or by shortening the ribbon cables. The noise may be caused by reflections in the long un-terminated data bus lines. For now, short cables is the fix.
For those who are interested in an improved system that will run CP/M, I am developing a single-board simple CP/M-capable Z80 computer. The kit should be available by the end of the year. No cables, so less noise.
I have completed the design of a set of circuit boards for the 8-bit processor. Here is a demo video, which includes a new pi calculation that outputs in decimal floating point:
The updated pi calculation code is on the 8-bit code page.
These circuit boards form the basis for a kit. You might also notice a single-board CP/M-capable Z80 computer in the video -- more about these things soon.
Using my old system to do some testing of new boards I noticed odd behavior. CP/M was not loading consistently. When I dumped high memory to see what was being loaded I got a screen that looked like this:
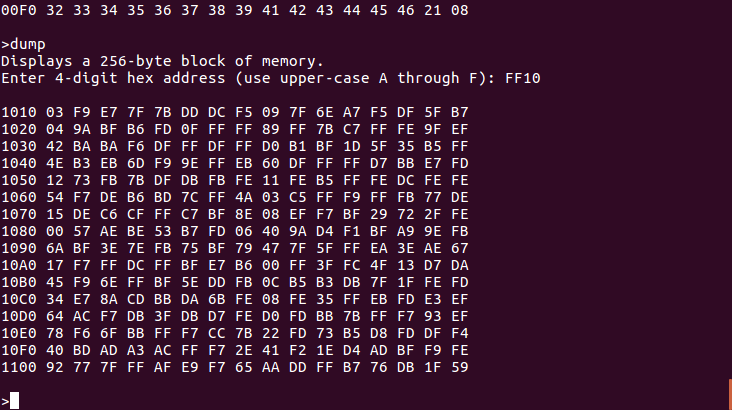
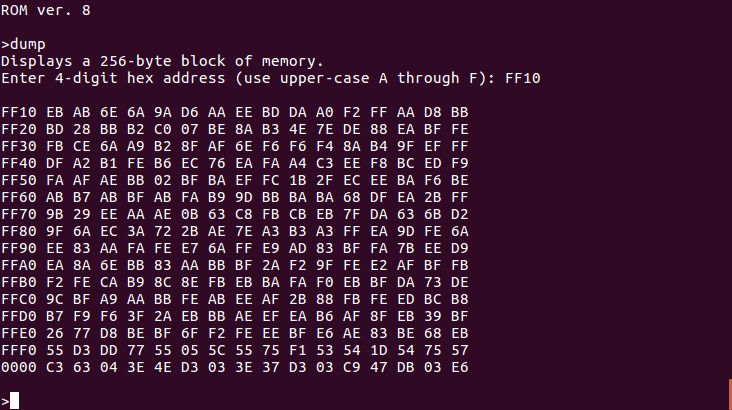
The memory dump was not working normally. The addresses are wrong, the memory contents here are irrelevant. The addresses are coming from a variable in high memory, so it seems that variable is getting corrupted somehow. The dump should look like this:
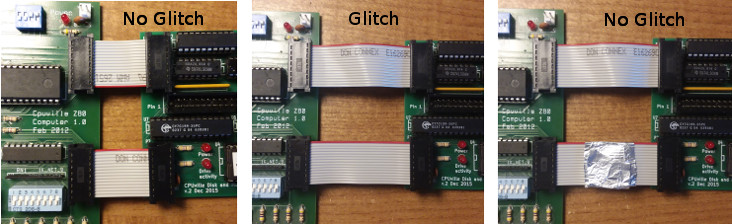
Only a dump of high memory in the system with the memory expansion was affected. Replacing ICs and much other troubleshooting did not solve the issue. Poking around I found that touching the Write (active-high) signal pins with my finger or a logic probe would suppress the glitch. So there was probably some kind of noise on that signal line. Further poking, I found that grasping the lower ribbon cable, which has the Write signal wire, with my thumb and forefinger suppressed the glitch. Putting a metal object on the cable, like a coin, or wrapping the cable in aluminum foil also suppressed the glitch. And, shorter cables suppressed the glitch:
I do not know the root cause of this glitch. I will do further testing with an oscilloscope in the future to see if I can figure it out. If anyone reading this has an idea why this might be happening, please let me know.
I have not heard from any customers that anyone else has this problem, so maybe it is just my very old system showing its age. If you think you may have this glitch, do the dump of high memory and see. If you have it, please let me know. Try wrapping the lower ribbon cable between the computer and memory expansion with foil. In the future, I will supply shorter cables with the kits.
In honor of Pi Day (March 14) I decided to write code for a pi calculation using the 8-bit processor. I had to learn binary floating point, and chose the IEEE-754 single-precision standard to do the calculation. The calculation is a numeric integration using the perimeters of polygons of increasing sides contained within the unit circle. The perimeter approaches 2 pi as the number of sides increases. I had to create subroutines for adding, subtracting, multiplying and dividing floating point numbers, and for doing square roots. Here is a screenshot of the calculation:
The output is two columns of 32-bit floating point numbers in IEEE-754 format. The left column is the number of sides in the polygon, and the number in the right column is the value of pi derived from the perimeter. The value of pi calculated is 0x40490FD7, which is 3.1415918 decimal. It reached this value when the polygon had 16384 sides. This value of pi is within the limits of the number of significant figures carried in the IEEE-754 format and the rounding errors of the subroutines in the algorithm. The code is a little less than 6 kilobytes long, and the calculation took about 2 minutes. I have placed the code files on the 8-bit code page.
Customer David Byres (his blog about gadgets is here) has made some 3D printed stands for the CPUville computer with the bus display attached:
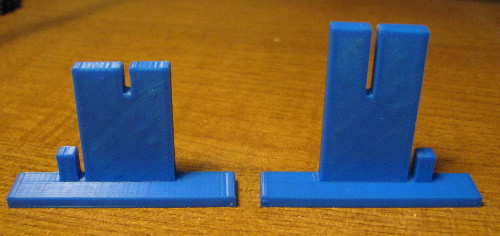
They allow one to run the computer while holding it upright:
If you are interested in obtaining these stands, please let me know, and I will see if David will print some for you.
One of the criticisms of the CPUville Z80 computer kit is that the circuit board lacks mounting holes. But customer Ted McFadden has designed a 3D printed case (with mounting holes at the corners) for the computer board, and has posted the design on a Thingiverse page. He has offered the design for use under a Creative Commons license, available without charge if you print your own case. If you don't have a 3D printer, but want a case, contact me, and I will see if Ted can print one for you.
Due to an increase in the cost of the circuit board, I am forced to increase the price of the computer kit to $45.00, effective January 1, 2018. I could probably find a cheaper supplier abroad, but I would like to stick with an American manufacturer, Advanced Circuits in Aurora, Colorado. I hope you understand, and will continue to support CPUville (and Advanced Circuits) with your purchases. Thanks.

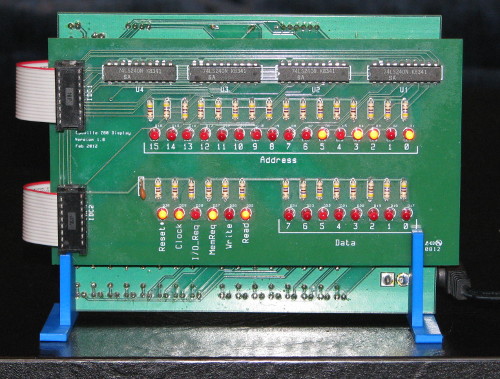
Many customers have contacted me wondering if there was a way to keep the bus display connected after adding the serial interface or disk and memory expansion boards to the basic computer. I had thought that no one would want to do this, since the serial interface and disk expansion boards need to run on the fast clock, so the bus display would just be a blur, but now I realize that especially with the serial interface, one might want to simply switch between the slow and fast clocks from time to time to demonstrate the bus activity on the slow clock without having to disconnect and reconnect the serial interface. So, I am offering for sale the custom cables shown in the photo above. These allow the bus display to remain connected while the serial interface is in use. They also work with the disk and memory board attached. If you would like a set of these cables, contact me. I will sell 11-inch cables for $6.50. I can make longer cables if you like, just tell me how long and I will quote you a price.
For those of you who have CP/M 2.2 running on the CPUville Z80 kit computer, you have no doubt noticed that adding files to the CP/M system from the PC is a bit awkward. One has to use the CP/M program MONITOR.COM to do a binary transfer of the file into the computer memory, then the CP/M built-in command SAVE to store the file onto the CP/M disk. I had sought to use any of several XMODEM-type CP/M programs to do file transfers, but they all required a system with two serial ports, one for the terminal, and one for a modem to do the file transfer.
However, customer Stephen Williams has modified two XMODEM CP/M utilities to perform file transfers from the PC to the CPUville Z80 kit computer over the single serial port. These utilities, PCGET and PCPUT were created by Mike Douglas for his Altair 8800 Clone computer. He derived them from the original XMODEM-based file transfer utilities created by Ward Christensen in 1977 for his early bulletin board systems. With the permission of both Mike Douglas and Stephen Williams I have placed the code for these utilities on the CPUville CP/M code page for download.
PCGET will transfer a file from the PC over the serial interface onto the CP/M disk, and PCPUT will transfer a file from the CP/M disk to the PC. To do this, one must be using a terminal emulation program with the ability to do XMODEM-protocol file transfers. In the Linux environment, minicom will do this. In the Mac environment, the serial program will work. In Windows however, the Realterm program recommended for use with the CPUville Z80 kit computer does not do XMODEM transfers. Instead, use the ExtraPuTTY program.
One last thing: to get PCGET.COM onto the CPUville computer you will have to do the MONITOR.COM binary transfer and CP/M SAVE procedure, as explained in the disk and memory expansion kit instructions. After that, you can use PCGET to do file transfers.
You probably noticed that I have redone the entire website. I made these improvements:
Let me know if you like it. Feel free to suggest improvements. If you find errors, or broken links, please let me know.
I have finished the 8-bit processor prototype. It is working well. Here is a demo video:
Note that the processor is connected by an adapter to the CPUville Z80 computer system board, plugged into the Z80 socket. I plan to put details of the design and construction of this processor on the web site in the future.
It has come to my attention that some 6116 2K RAM ICs that have been shipped with the CPUville Z80 computer kits may be defective. You can test yours by running the memory test program, located at 0x0074 in the v.7 EPROM. If you believe you have a defective 6116 RAM IC please let me know, and I will send you a replacement.
I am developing an 8-bit computer processor that I may offer as a kit.This processor is similar to the original CPUville TTL processor, with some important differences. First, it has an 8-bit data bus, and a 16-bit address bus (that is, a 64K address space), matching the Z80's data and address bus. This means it can use the same system as the CPUville Z80 computer, by plugging into the Z80 slot on the computer kit board (using a cable of course). Second, I fix some of problems with the original processor, in main, that the ALU size did not match the instruction size, preventing easy uploading of programs. Instructions on the 8-bit processor are of varying length, instead of the single size of the original processor. Also, I have strengthened some of the hardware issues, for instance, latching the controls that need to be held steady when the state changes for writing memory or ports. A kit for this processor may cost $80 to $100. Anyone interested?

Tiny BASIC! In discussion with another hobbyist I realized I could assemble Tiny BASIC and it would fit into the CPUville Z80 computer 2K ROM space, taking the place of the v.7 EPROM. I made a few modifications to the code to match the CPUville computer's port addresses and UART status bits, and it works fine:
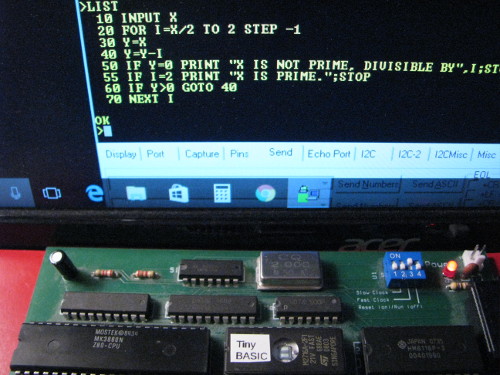
This is Li-Chen Wang's original Tiny BASIC that was first published in Dr. Dobb's Journal of Computer Calisthenics and Orthodontia in May, 1976. Here is a link to a draft of the instruction manual I am preparing. If you would like the code, please email me. I can also sell you a pre-programmed EPROM with Tiny BASIC for $5.80.
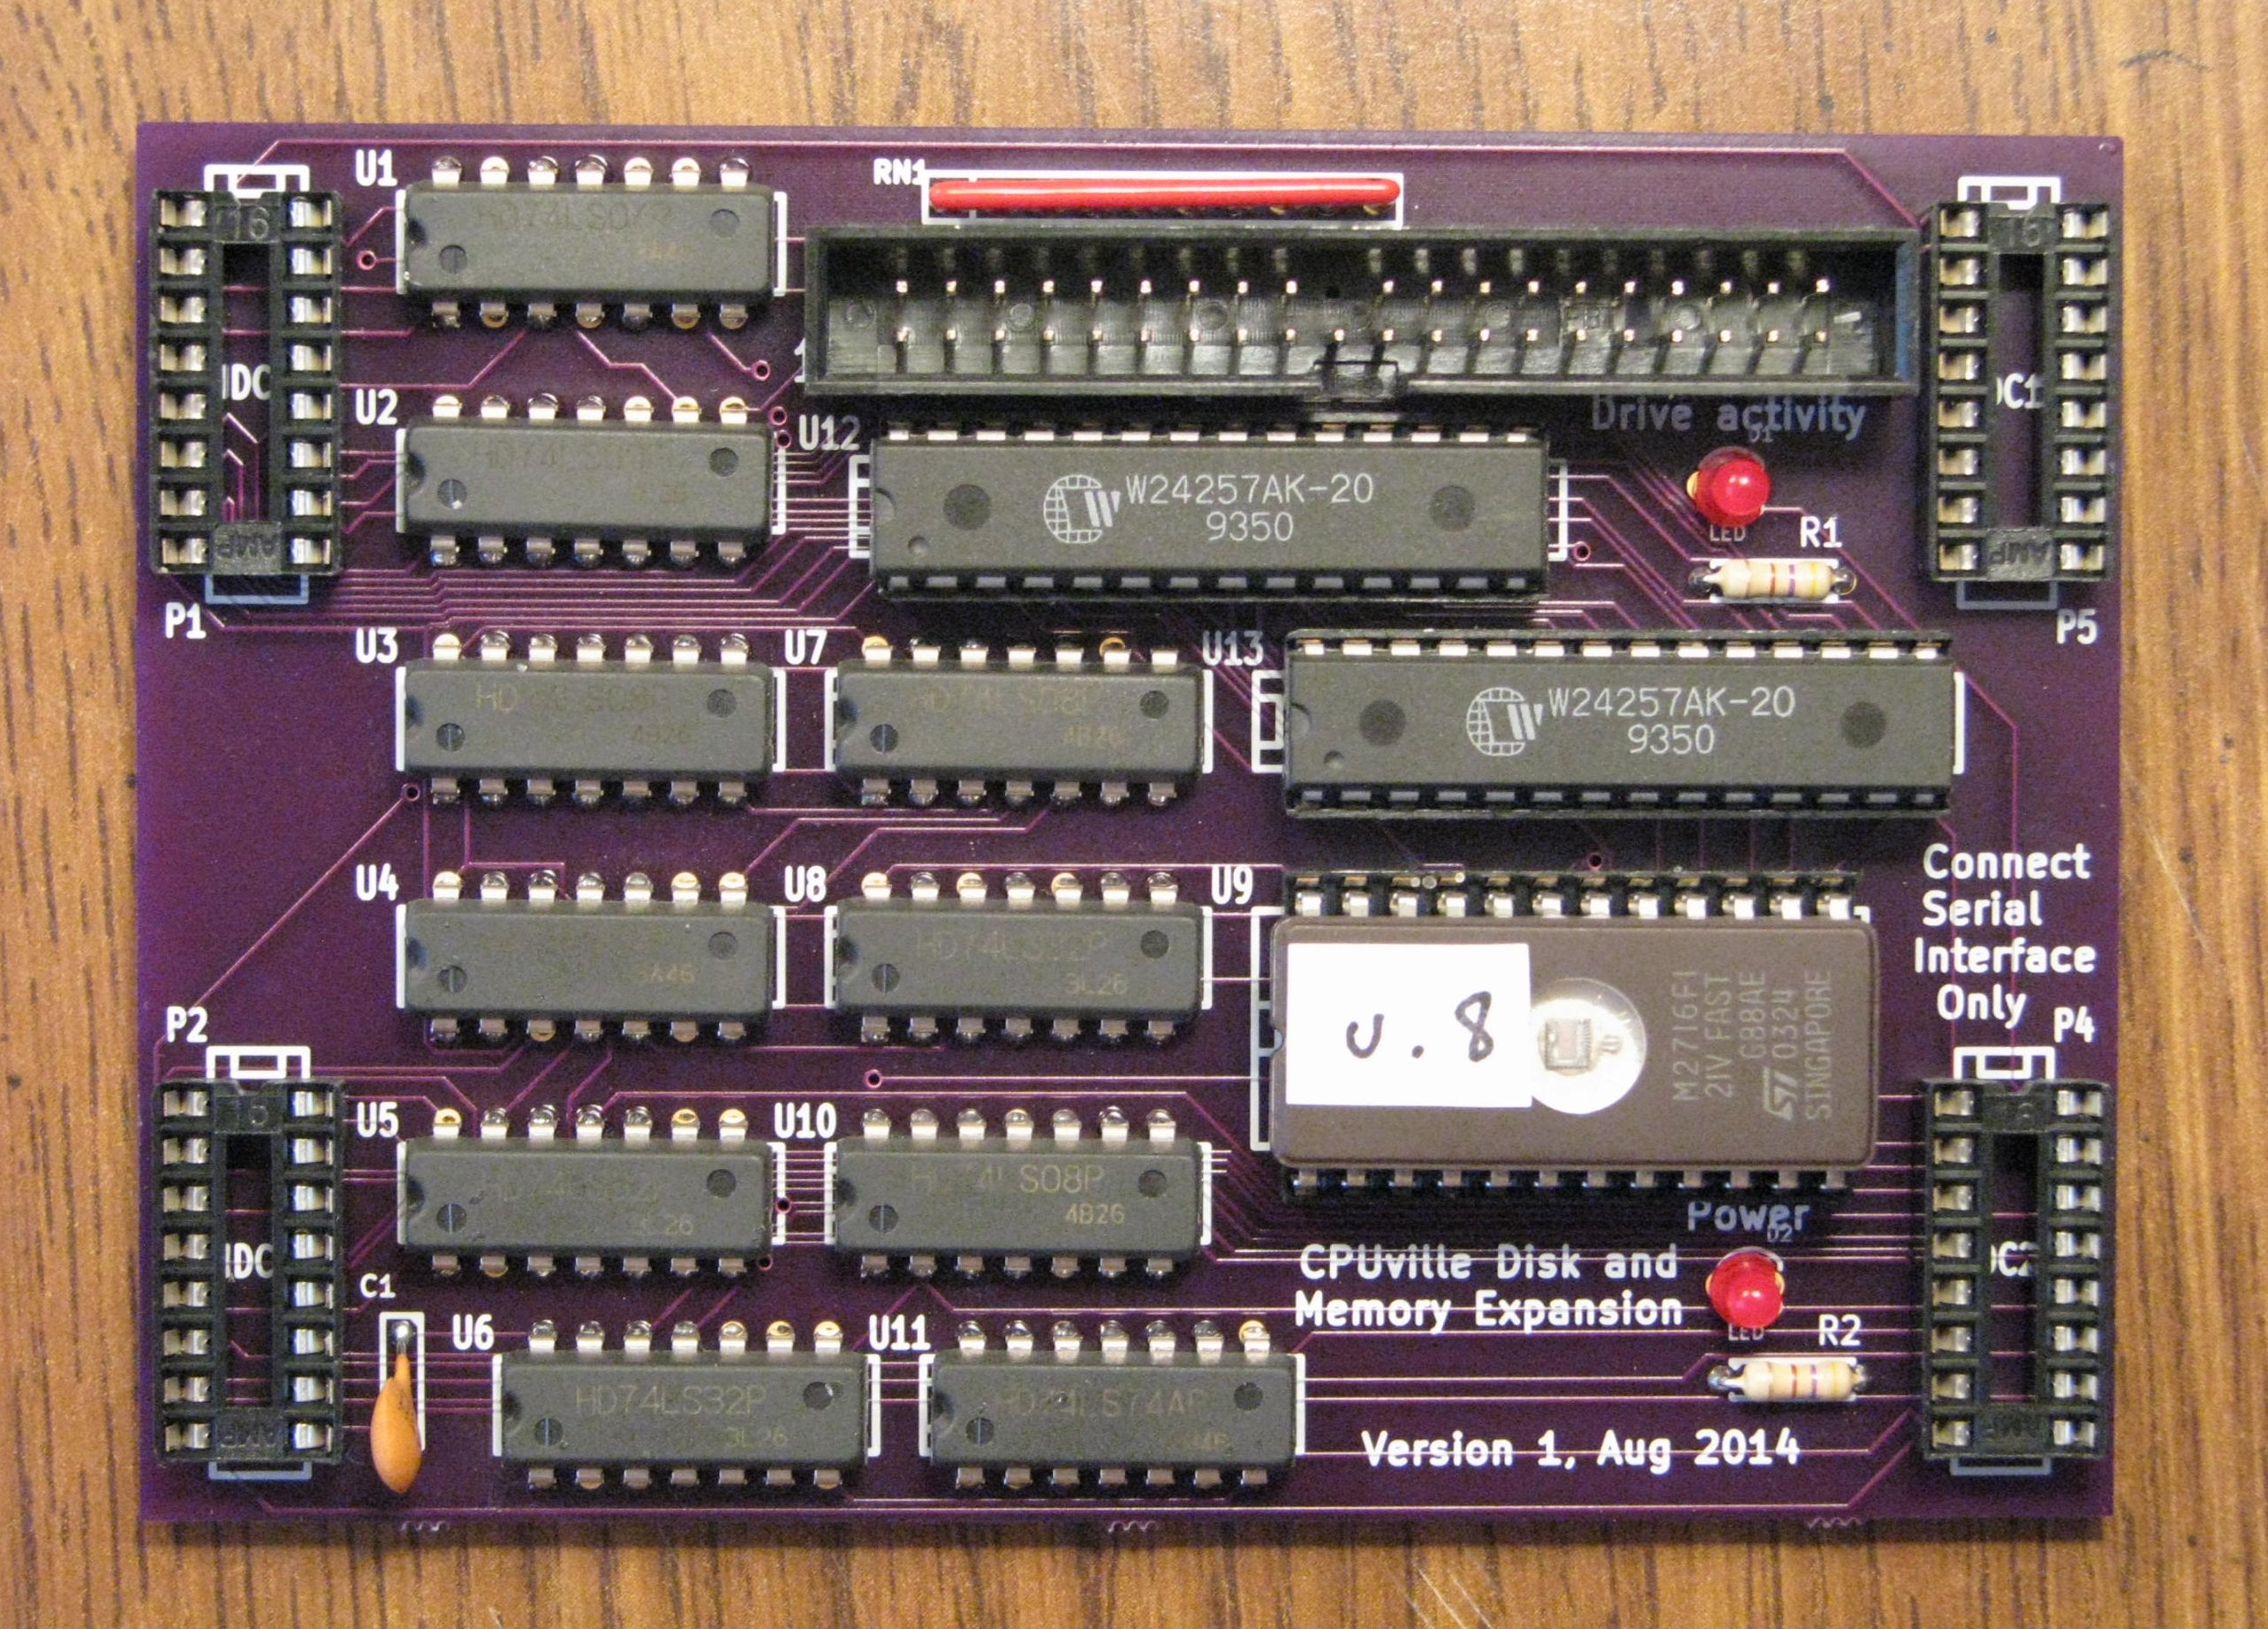
Announcing version 2 of the Disk and Memory Expansion Kit! The kit now uses a programmed gate-array logic chip (GAL) to implement the memory configuration logic. This saves space, meaning a smaller circuit board, and fewer ICs to solder.

I had hoped this kit would be cheaper, but sadly the price of the memory ICs is going up, so it is still going to cost $36.00. Oh well...
I have heard from a customer that he has a Transcend flash module that does not work with the disk interface. The ones I had on hand worked fine. I think there are different electronics or manufacturers for some of these modules. The working modules have identification numbers with the format XXXXXXX XXXX XXXX XX XXXX. The non-working module has an identification number with the format XXXXXX XXXX XXXXXX XXXXX. I will try to get more information about this, but for now, it might be best to avoid buying a Transcend module. If you already have one, try it, and let me know if it works or not, that will help.
First the bad news, then the good news.
The bad news is I have been unable to get the Western Digital mechanical drives working on my IDE interface. I contacted the company, and they were gracious enough to share their OEM technical documents with me, but there wasn't anything there that helped me. I now suspect that there is a minor electrical difference between their drives and the others that work that makes them incompatible with my interface.
The good news is that I have tested an SD card to IDE adapter with my interface, and it works. The adapter I used is made by Soarland, model SLOA063. I found one on Amazon for $18.98.
I now have Disk and Memory Expansion kits for sale.
See the details page. The price is $36.00. I have tried using it with a number of different disk drives, including mechanical hard disks, solid-state IDE drives, and Compact Flash drives in an adapter. Most work fine, but I have trouble with Western Digital hard drives. I am trying to get information from the company to see if I can figure out why they don't work with this interface. I will post information here if and when I get it. There is a table of tested drives in the Disk and Memory Expansion instruction manual.
I have created a web page that explains how I got CP/M working on the computer. It has the details, and links to source files and manuals.
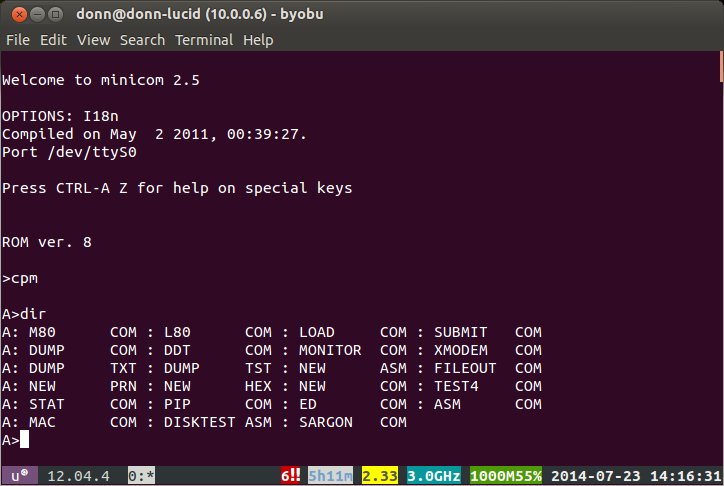
I have installed CP/M 2.2 on the system with the wire-wrap prototype disk and memory expansion board. Here is a screenshot of the CP/M directory listing:
With CP/M installed you have access to many hundreds of programs that will run on the computer. I found a chess playing program called Sargon. I installed it and it ran without problems. It has only text output, so I put up a graphical chess board next to it to track the moves. Here is a screenshot of me playing Sargon on my computer:

I have ordered prototype printed circuit boards for the disk and memory expansion. If all goes well, and the prototype works, I should have kits available in a few weeks. The price will probably $30, disk not included. You will be able to use any old IDE disk, but you will need to provide the 12V power if you use a mechanical disk. More soon.
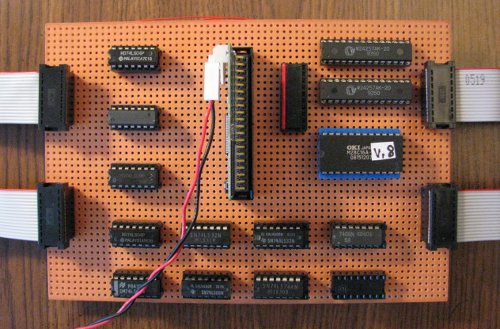
I have finished a prototype disk drive interface and memory expansion board for the Z80 computer kit. The disk drive interface is a parallel ATA interface (also known as PATA, or IDE). This is the interface used for the hard disk in most PCs until the serial ATA interface was adopted. The memory expansion has two configurations. In configuration zero there is 2K of ROM from 0000h to 07FFh, and 62 K of RAM from 0800h to FFFFh. In configuration one, the memory is 64K of RAM only. A software-driven flip-flop selects the configuration. Here is a picture of the wire-wrap prototype, with a 1 Gb solid-state drive:
This expansion board will allow the Z80 computer to run the CP/M operating system. I am currently working on the CP/M BIOS and loader programs. I will update this page soon when I have more information.
The serial interface development is finished. The price will be $25.00. See the demo videos, or the serial interface kit details page for more information.
I am developing a serial interface board to use with the Z80 computer. This will allow you to use the serial port on a PC (or a dumb terminal like a DEC VT100 or Televideo 925) to communicate with the computer, using a keyboard and text display. I am in the process of refining the prototype and writing the software for the interface. The software includes a tiny monitor program that allows you to display blocks of the Z80 computer's memory on the display, and to load memory with bytes entered as hexadecimal characters, and jump to (run) programs you load. The software will also have some utility subroutines to make it easier for you to write programs. Here is a picture of the working prototype:

It will run at 2400 or 9600 baud. You need a straight-through serial cable to connect the interface to the serial port on the PC or to a dumb terminal. I have used it with a PC running Windows XP and the Hyperterminal program, and with Ubuntu Linux running minicom. I also used it with my Televideo 950. With a PC, you can dump a Z80 program to the screen as hexadecimal characters, and copy and paste this text into a file to save the program. Then, you can open this file in your PC's text editor, copy the text, and paste it back into the terminal program screen to load a program back into the Z80 computer. Not quite as good as the Z80 having its own disk, but close.
The serial interface kit will cost about $27.00. It should be ready in about a month.
There are still some switch noise issues. I have written a new ROM (version 6) with much longer debounce delays. I increased the delay time from approximately 1 msec to 16 msec. This seems to make the switches more reliable. This changes the entry addresses for the Memory Test, Peek and Poke routines. I have edited the kit instructions accordingly. Here are the new ROM files:
ROM v. 6 assembly language fileI have become aware that the program loader program sometimes loads two bytes instead of one with each switch throw. The resulting programin RAM will not execute properly. This appears to be the result of excessive "switch bounce", or noise. This is a characteristic of all mechanical switches, and can result in a series of rapid open-close events that are detected by the very rapid polling of a computer system. The bounces are too fast to be seen by eye, but the computer detects them. One can compensate for switch bounce by creating a bounceless switch, using a flip-flop, or in software by a debounce delay loop. To save money, and make the project board as simple as possible, I chose the latter route. The debounce delay in the ROM software worked fine in the prototypes, and in a freshly built kits, but it seems as the kits age, the switches get bouncier (noisier) and the loop delay time is no longer adequate in some cases. I have increased the debounce delays in the program loader and poke programs in a new ROM version. If you can program your own ROM, you can download the files from this page (see below) and do it yourself. If you can't program your own ROM, and you want to change the software to the new version, send me your ROM and I will program it for you, and send it back to you (no charge of course). Just email me and let me know what you want to do.